Test Your Enonic Apps with Jest and Mock XP
Get valuable insights into leveraging Jest alongside Mock XP to ensure your Enonic applications run flawlessly.
Written by Thomas Sigdestad on

Get valuable insights into leveraging Jest alongside Mock XP to ensure your Enonic applications run flawlessly.
Written by Thomas Sigdestad on
We recently held a Meetup in our office, where Alan Semenov, VP Engineering at Enonic held a talk about testing your Enonic apps with Jest and Mock XP.

Previously we have received feedback hinting that our approach to testing JavaScript code might need improvement. We've heard you, and in response, we’re diving into the process of writing effective tests for your Enonic apps. Unconventionally, we'll start with a FAQ section to address common questions and set a solid foundation before delving into the details.
Jest is an open-source testing framework built with JavaScript for JavaScript. While it is primarily designed for JavaScript frameworks, it can also be used with other JavaScript-based languages, for example TypeScript. Jest is favoured for several reasons:
Jest allows you to write tests for both client-side and server-side code. It supports integration with various frameworks, including React, Redux, Vue, Angular, Next.js, and Nuxt.js. The support extends beyond these, as there are tutorials, guides, and code examples available for many other frameworks.
Setting up Jest is straightforward and flexible, whether you are using JavaScript or TypeScript.
For JavaScript, you simply install Jest. It gets added to your `package.json`, and you're ready to go.
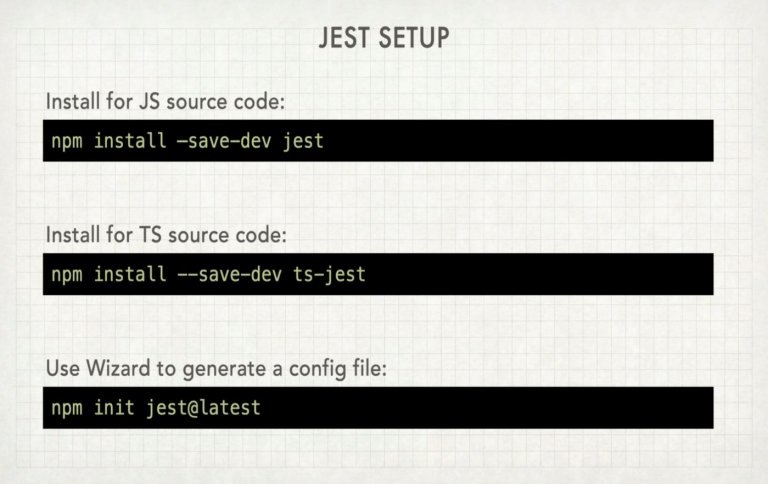
For TypeScript, you use `ts-jest`, which includes both Jest and the necessary type definitions. It's recommended to use the wizard to generate the configuration file. The wizard will ask questions about your framework and test storage location, then generate the config file for you. If you prefer not to use the wizard, you can manually configure Jest by referring to the documentation for the relevant configuration properties.
Next, you add a script to your `package.json` for running tests, typically named "test." For frequent test runs, include the `--no-cache` option to ensure tests are always executed.
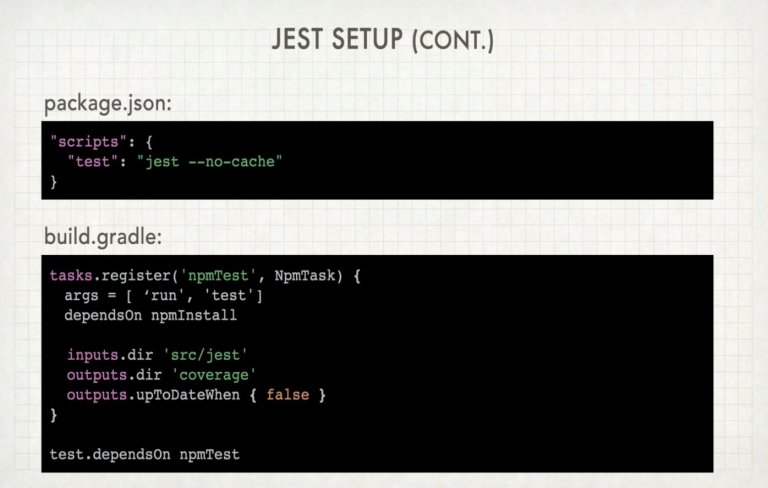
To integrate Jest with Gradle in an XP environment, add a Gradle task that links to the corresponding NPM script added in the previous step. This task runs the Jest tests every time the build process is triggered. If you remove the last line in this task, the tests will be skipped if there are no changes in either the test code or the source code being tested.
Finally, add a configuration to your Gradle setup to ensure that Jest tests are included whenever Gradle's test task is executed - that's the very last line in the screenshot abo. This ensures comprehensive testing by including Jest tests along with any other tests you might be running, such as Java tests or backend tests.
The syntax of Jest is straightforward and involves three key methods: `describe`, `test`, and `expect`.
Matchers are methods that allow you to assert various conditions. Common matchers include `toBe`, `toEqual`, `toBeTruthy`, `toBeFalsy`, `toBeNull`, and others. Matchers can also be inverted using `.not`. For example, `expect(value).not.toEqual(something)` checks if the value is not equal to a specific value.
Here is a simple example to illustrate the syntax:
```javascript

describe('Basic Math Operations', () => {

  test('adds 2 + 2 to equal 4', () => {

    expect(2 + 2).toBe(4);

  });
  test('object assignment', () => {

    const data = { one: 1 };

    data['two'] = 2;

    expect(data).toEqual({ one: 1, two: 2 });

  });
  test('true is truthy', () => {

    expect(true).toBeTruthy();

  });
  test('false is falsy', () => {

    expect(false).toBeFalsy();

  });
  test('null is null', () => {

    expect(null).toBeNull();

  });
  test('value is not 5', () => {

    expect(4).not.toBe(5);

  });

});

```
In this example:
For comparing objects, use `toEqual` instead of `toBe`, as `toBe` is for primitive values. The matchers `toBeTruthy` and `toBeFalsy` are used to test boolean values.
This syntax makes it easy to write and understand tests, ensuring your code behaves as expected.
To start with a simple test, let's take an example of a Fibonacci sequence generator. We want to ensure it returns the correct sequence for a given number of elements. Here’s how you can test it in TypeScript using Jest:
```typescript

import { describe, expect, test } from '@jest/globals';

import { generateFibonacci } from './path-to-your-code';
describe('Fibonacci Sequence Generator', () => {

  test('generates the first ten Fibonacci numbers', () => {

    expect(generateFibonacci(10)).toEqual([0, 1, 1, 2, 3, 5, 8, 13, 21, 34]);

  });

});

```
This simple test checks that the function `generateFibonacci` correctly returns the first ten Fibonacci numbers.
Next, let’s discuss mocking. Mocking is crucial for isolating the unit of code being tested, ensuring it doesn’t call external dependencies. This is different from spying, which only checks if a method was called without replacing it.
Here's an example of mocking a function:
Here's how you can mock the `sanitize` method using Jest:
```typescript

import { describe, expect, test, jest } from '@jest/globals';

import { yourFunction } from './path-to-your-code';

import * as libCommon from 'libxpm-common';
jest.mock('libxpm-common', () => ({

  sanitize: jest.fn()

}));
describe('Your Function Tests', () => {

  test('uses the mocked sanitize method', () => {

    libCommon.sanitize.mockImplementation(() => 'mocked output');
    const result = yourFunction('input that requires sanitization');


    expect(result).toBe('expected result based on mocked sanitize');

    expect(libCommon.sanitize).toHaveBeenCalledWith('input that requires sanitization');

  });

});

```
In this example:
By mocking dependencies, you can focus on testing your code in isolation without worrying about the actual implementation of external methods. This approach ensures your tests are reliable and do not depend on the behavior of external libraries.
Do you need to mock all of the Enonic XP API? The good news is, you don't have to do this manually. We’ve created an NPM module called Mock XP, which simplifies the process.
Mock XP is designed to help you run tests without needing the actual XP environment. This is especially useful for CI/CD pipelines on platforms like GitHub, where XP may not be running. Mock XP currently mocks nine core APIs and is available in version 1.0.
Here’s how to use mock XP:
Here’s a basic example:
```typescript

import { Server, LibNode } from '@enonic/mock-xp';
const mockServer = new Server();

const repo = mockServer.createRepo({id: 'test-repo'});

const nodeInstance = new LibNode({ repo });
// Now you can use methods from libnode, such as connect, create, etc.

nodeInstance.connect({...});

```
This setup allows you to use core XP methods without having XP running. It ensures your tests focus solely on your code.
Here's a more complex example to illustrate how mock XP can be used to create and verify nodes:
```typescript
import { Server, LibNode } from '@enonic/mock-xp';
const mockServer = new Server().createRepo({id: 'my-repo'});

const repo = mockServer.createRepo({id: 'test-repo'});

const nodeInstance = new LibNode({ repo });
const createdNode = nodeInstance.create({ _name: 'example-node' });

const expectedNode = { _name: 'example-node' };
expect(createdNode).toEqual(expectedNode);

```
In this example:
LibNode` mock is created and connected to this mock server.This way, you ensure that your tests are isolated from the actual XP environment, allowing you to focus on the functionality of your code without worrying about the underlying XP infrastructure. This is particularly useful for maintaining a robust testing suite that can run in various environments, including CI/CD pipelines.
When working with React for client-side testing, it's crucial to set up an environment that mimics the browser, including objects like `window` and `document`. You need to adjust your Jest configuration to use the appropriate environment, typically Jest DOM for client-side testing, as opposed to Node for server-side testing.
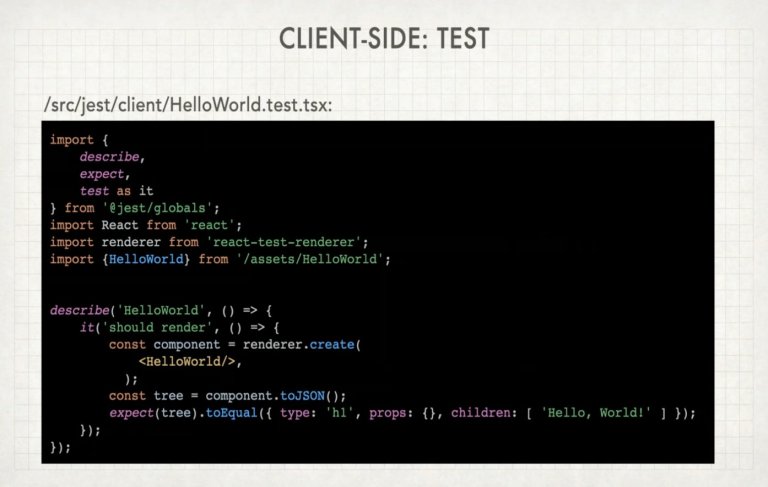
Start by installing React and the necessary packages. A simple React component, such as one that renders "Hello World," can serve as a basic example. The test setup involves importing the component and using React Test Renderer to simulate rendering the component without a browser. You can then use Jest to verify the rendered output, ensuring it contains the expected elements and text.
During our integration with Jest, we established several best practices:
Additionally, we introduced a TypeScript Starter that simplifies the process of running Jest tests. This starter is a minimalist setup, excluding previous example code, allowing you to add your code and tests which will be automatically recognized and executed by Jest.
In this demonstration, Alan showed how you can run tests without having Enonic XP running. First, we'll use the command `enonic create` to create a new example project. For this example, we named it "example Jest." The specific name isn't crucial here. A clean sandbox would be created and there's no need to start this sandbox since we're not running XP.
To illustrate, Alan navigated to the project directory and showed us the structure. This is an actual XP app, not a mock setup. The source folder contains client and server tests, with a few client-side tests included.
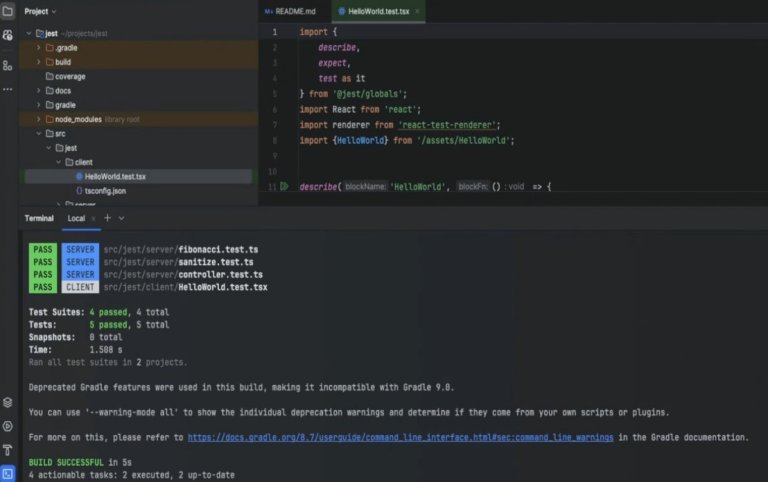
Now, let's run the tests using Gradle. Since this is the first run, it will install some necessary NPM libraries. Once that's done, the NPM tests will execute, showing all tests passing without XP running. This is advantageous because it eliminates the need to start an XP instance, saving time. In this case, the tests took 1.5 seconds to complete. For context, in a larger project with over a thousand tests, it took around five seconds, demonstrating the efficiency of this approach.
Q: Can you run NPM tests directly, not via gradle?
A: Yes, with `npm run test` command.
Q: Can you run tests with the CLI?
A: Yes, you can use the `enonic project test` command inside your XP project folder.
Regarding performance testing, there's integration with K6 for performance testing, traditionally used for this purpose. While performance testing has been a consideration for years, it hasn't been fully integrated yet, but it's on the list. You can still use K6 in your pipelines for now.
In summary, you can efficiently run tests without XP, leveraging tools like Gradle and NPM, and explore performance testing with K6 in your workflows.

Get some more insights 🤓